Saturday, June 30, 2012

Mr.& Mrs. Bag

Today we are attending the wedding of a very close family friend. I have known the groom my whole life seeing as he lived 3 houses down from me for almost 18 years. It is sure to be a wonderful celebration. I made this little gift bag to hold our gift to them.
I made this bag using both my Cameo and Expression and I am finding myself doing that more and more, especially since I learned I can use my Cricut mat in my Cameo...pretty cool right?
The bag was cut using Wrap It Up and the hide/contour button on my Gypsy to remove the wine glasses on this cut. I used the strong red adhesive tape to put it together. 

I added the layered tags off CTMH Art Philosophy and cut the "Mr. & Mrs." on my Cameo using Victorian LET font from my computer. I added little gems after taking this photo.
The final touch was a little tag with the rings from Summer Celebrations layered on the top of the same style tag on the CTHM cartridge. I hope the day is as beautiful as possible for them. Hope you weekend is as well.

Friday, June 29, 2012

Butterfly Cards

I love when I can use the negative cuts left over from another project and make something just as fun and cute. A little while ago my daughter wanted to make a project and she needed butterflies. I was left with these cuts.
Now I have taken those cuts and turned them into a trio of 5x5 cards to have in my stash. I didn't have to cut anything extra to make these cards because I already had the negative cuts from Everyday Paper dolls. I just selected some papers and added some Martha Stewart Paper tape, strips of paper I cut, a few buttons and fun sentiment stamps to create these. Enjoy!
Sentiment from Pink By Designs Animated Greetings
Sentiment from My Pink Stamper's Buggy Punnies
Sentiments from K. Andrew Designs Of Mice & Lil Men
Thanks for stopping in for a little look at my fun new cards!

Thursday, June 28, 2012

No Cricut Thursday #15: Be Happy Card

Happy Thursday...Is it hot where you are??? Illinois is supposed to get up to 101 today and all around the temps are soaring. A great day to stay in your air conditioned craft room and create right?
I just put this cute card together last night using my Pink By Design Subway Art stamps and my new Anna Griffin Paper. I saw this idea for cutting the bottoms of paper with a square punch at Pennants and Pinwheels and wanted to make a card to try it out. I cut my paper into 1 1/4 in strips (I wanted an overlap). When I got them on the card I wanted a topped and I had just cut the edges using my YourStory paper cutter with the wavy edge and it made the perfect topper.
I did this on the inside of the card as well when I felt the stamps looked lonely without any extra color to go with them. 
Just a simple card with No Cricut or Silhouette Cuts, but some great sentiments from one of my favorite stamp sets. 


Wednesday, June 27, 2012

E is for Egg Layout

Yesterday afternoon when I had some free time to scrap I was not sure what I wanted to work on so I decided to start with paper. I just got the Lizzie Collection paper by Anna Griffin and they are so beautiful that I had to work with them. The egg hunt photos I had from last Easter were just the right fit.

I wanted my layout to be simple, but still 2 pages and when I saw this Page Map by Becky Fleck I knew what I wanted to do with the photos and this wonderful paper. I selected my 3 favorite photos and several sheets of the paper (plus one piece from my new K & Company stack).


I cut strips of the paper to form the patchwork area next to one photo. I am a little afraid of stitching still so I added some flat stick on gems to the middle edges and my ribbon points instead. I was not sure what I wanted for the bottom corner area of the page map but I wanted the different papers on both pages so I made a 1 inch strip using all of them and added it to both pages. 
Layout using the page map
The final step was to add a simple title. When I went to my Gypsy and typed in egg it pulled up the e is for egg cut on Kate's ABCs and I knew it would be just right. With the cute basket from Celebrate With Flourish (love the Stickles on the eggs) I was totally satisfied and another fun double layout was completed. Tomorrow welcomes the return of No Cricut Thursday with a simple card! Have a great day all!

Tuesday, June 26, 2012

Capturing the Moment


Every year we buy printed frames for our 8th graders as a memory from our dance. This year we were left with an unusually large amount of leftovers and they were given to me to play with!!!!! 

Yesterday afternoon I was reminded that my daughter asked for a photo of her and her Poppy (great grandpa) for her bedroom so I grabbed one of those frames and went to work. I just bought the K & Company Sweet Nectar Specialty paper and mat stacks and they are so pretty that I knew they would be just right. I measured and cut so I would have the mat just right.
I did not want to have rough paper edges on the inside frame and I had miss cut the inside a little bit, so  I used the strong red tape and applied a ribbon  I had from the Target dollar bins to all 4 edges.

I knew that I wanted a sentiment on one corner of the frame and I cut this basic shape that came with my Cameo and stamped on the sentiment of my choice from the Pink By Design, Just Breathe set. I lightly inked around the edges as well.


The final step was making the 3D flowers by Lori Whitlock via the Silhouette Store. I love making this type of flower, just slide your pieces onto a brad and curl the edges until you like you look. I also folded the leaves and drew a light green line in the middle with a colored pencil before I stuck them on with large glue dots.
I am very happy with this simple frame and my daughter squealed. I am also happy that this is the perfect link-up to the Tuesday Link-Up Party at Pink By Design.  Have a wonderful day!

Monday, June 25, 2012

Tag Card: CAS-ual Friday Challenge

Today I decided to work on a project for a new challenge I have discovered. CAS-ual Fridays challenges are all about Clean and Simple designs. I sometimes feel that I add way to many details to my projects so I felt this would be a fun challenge blog to help me minimize a little bit (some of the time)!! The challenge this week (link above) is Pretty in Pink.
I went to my scrap paper bin and found some pink patterned paper that matched this little gem stickers I recently bought and started there. I was stuck so I added some ribbon behind the white layer piece. 
I still felt that just a sentiment would be too plain so I added a small tag cut from Ashlyn's Alphabet before stamping this cute stamp from Pink By Design. Now I have a pretty in pink card all set for this fun new challenge.

Sunday, June 24, 2012

Bathing Beauty Birthday Bag

My daughter will be attending a birthday party this afternoon for one of her friends. Lauren's birthday was actually this past winter, but she asked her Mom if she could have her party in the summer because she loves the water! What a great idea!
For this cutie on the bag I used Everyday Paper Dolls and attached her over an 8x8 sheet of water paper. I added the birthday girl's name using the Pooh font Set.
For the final touch I cut a simple beach ball from Life is a Beach. I have a feeling all will have a great time at the party!
In my effort to take part in more challenges this summer I am adding this one to Celebrate the Occasion Welcome Summer Challenge!

Saturday, June 23, 2012

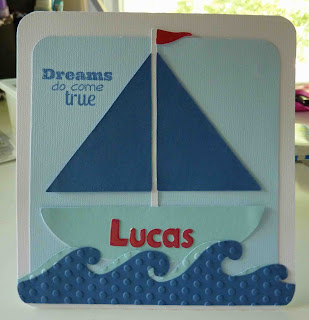
Dreams Come True...

When you are waiting for your first baby to be born it is a long process and when you have to wait even longer because you have had a hard time getting to that point, well there is only one statement that is just right..DREAMS DO COME TRUE! I have watched one of my co-workers wait and wait and on Wednesday, her dream came true!
I helped with some shower decorations and know there nursery theme is sailing so I made a simple and cute boat (Just Because Cards) card with their new son's name (Mickey Font) on it.  I am over joyed for her.  I used some Glossy Accents on his name and added the sentiment from K. Andrew Designs Of Mice & Lil Men set.
Mom and baby are happy and healthy and headed home today so I am going to get this in the mail right away.

This card also fits right into this week's Ink It Pink Challenge at Pink By Design where you are to use a red, white and blue theme. Until the end of the month you can use stamps from any company for these challenges.


Friday, June 22, 2012

Fun in The Sun:gift box

I am loving time to explore the Silhouette store and see what fun things I can make. I have to admit I love all the 3D projects offered for boxes and bags and more. I have a few little get together this summer and thought I would bring a simple gift to the hostess and this 3D Gable box by Lori Whitlock is just right for some lip gloss of small nail polish.
I pulled out my summer favorite: DCWV Summer Days stack and used the fun pink bikini page to make the box. 
Then I with the great fold lines that were cut out I put box together (about 4 3/4 inches high).
Finally I wanted to add something simple to the front and the Summer Days Mat stack has great little pieces you can cut out and add...so I did!!  Now I have a simple gift holder to bring to the marshmallow roasting party we are attending tonight!!  I am going to grab some sunscreen lip balm and mini-nail polishes to put inside!! Now off to get ready to see Brave the new Disney Pixar movie!!!

Thursday, June 21, 2012

Summer Days Mat Stack Cards

I am in love with DCWV Summer Days Stack. I love the solid card stock, the 12x12 paper and the mat stack.  I have been using this paper so much lately and find myself seeking out ways to use it more and more. Today I want to share 2 simple cards I made using the mat stack pages. I cut them the way I wanted and layered them onto some solid card stock (not a big surprise it is from the Summer Days stack!)

This first one if a thank you card with a touch of ribbon and a simple Cricut Cut off Cricut American Alphabet.
The second card is a fun 4th of July card. This time I cut out the title (Stand and Salute) and some stars (CTMH Art Philosophy) to add on top of the mat stack piece I layer onto the card. I wanted my stars to stick out a little so I decided to use some sand paper on the edges to bring out the white core and added little heart buttons to the center.  So easy and fun and 2 cards I needed all made.
Hope you have a happy Thursday everyone. We are getting some fun in the sun swimming today (thankfully the heat is not as bad as it has been!!) OH and Happy Official First Day of Summer!!

Wednesday, June 20, 2012

Summer Craft Time With Noodle Part 2 - NOODLES

On Monday when I found out I would be getting my tooth pulled I knew I needed to have a fun day with my daughter seeing as I knew I was going to be be pretty tired for a few days and not able to do very much with her so we went right for our Summer Jar and selected a slip.
Assignment: Let's dye pasta and create pictures or jewelry with it!
I found this idea, where else, on Pinterest via Aggieland Mommy and her summer bucket list. It was a hit as soon as my daughter saw the pictures of the colored pasta. Off we went to shop: pasta, rubbing alcohol, food coloring, string for out necklaces, and small Ziploc bags.
Easy steps to dye the pasta: 
- Put pasta in Ziploc (about 1/2 Cup)
- Cover with rubbing alcohol (about 1/4 Cup). 
- Add food coloring (Follow the box to get various colors)
- Zip the bag shut and mash the bag around to coat the pasta. 
- Lay them flat in the bags (above) and let them soak about an hour.
- Turn them over every now and than to coat the pasta better.
- Layout on paper towel to dry.
The more food coloring you add the brighter the colors
Once the pasta was dry the real fun began. My daughter wanted to make pictures, but she had an idea. She asked me to cut large paper dolls out so she could add noodles over them. I used Twinkle Toes and Everyday Paper dolls to make these. Super fun.
 Of course there was also some necklace making as well. 
 And we have a ton left over for another day, not to mention tons of leftover pasta to enjoy for lunch.
I am happy to report my dentist appointment went smoothly and I am feeling much better today. I should be back in my craft space tomorrow! Enjoy your day all!